|
|
 Building an APU Costume
It was a dark and stormy summer. No, that's not quite right, it was actually murderously sunny and clear, but I need an explanation why I'm spending time in my superheated garage working on a costume for Halloween.
Last Updated: 10/31/05
.JPG)
UPDATE: A
gallery of the
finished product, being added to as I get pics.Building an APU Costume
It was a dark and stormy summer. No, that's not quite right, it was
actually murderously sunny and clear, but I need an explanation why I'm spending time in
my superheated garage working on a costume for Halloween.
For background on a couple of my past costume projects, click here.
This year, I've decided to build an APU (as featured in The Matrix films). If you've seen either of the last two, you should be familiar with this beast. Essentially, it's a large bi-pedal robot with a human driver. My plan will be to build a sub-scale version that I can wear and that looks like I'm being carried by it.
Design goals
The Plan
The costume
will be comprised of three main parts:
I will use PVC as the base construction material again. Some of the lessons I learned from the Mech costume are as follow:
With these in mind, I'll make a couple of changes. Mainly, anything that takes large loads will be constructed of 1" PVC instead of 1/2". I've experimented with it, and it flexes a LOT less. I will still use 1/2" for decorative and for stringers to brace spots that the 1" is taking the main load on, but that's it. A side benefit of 1" PVC is that 3/4" PVC fits straight into it. This has potential for making convincing looking hydraulic pistons.
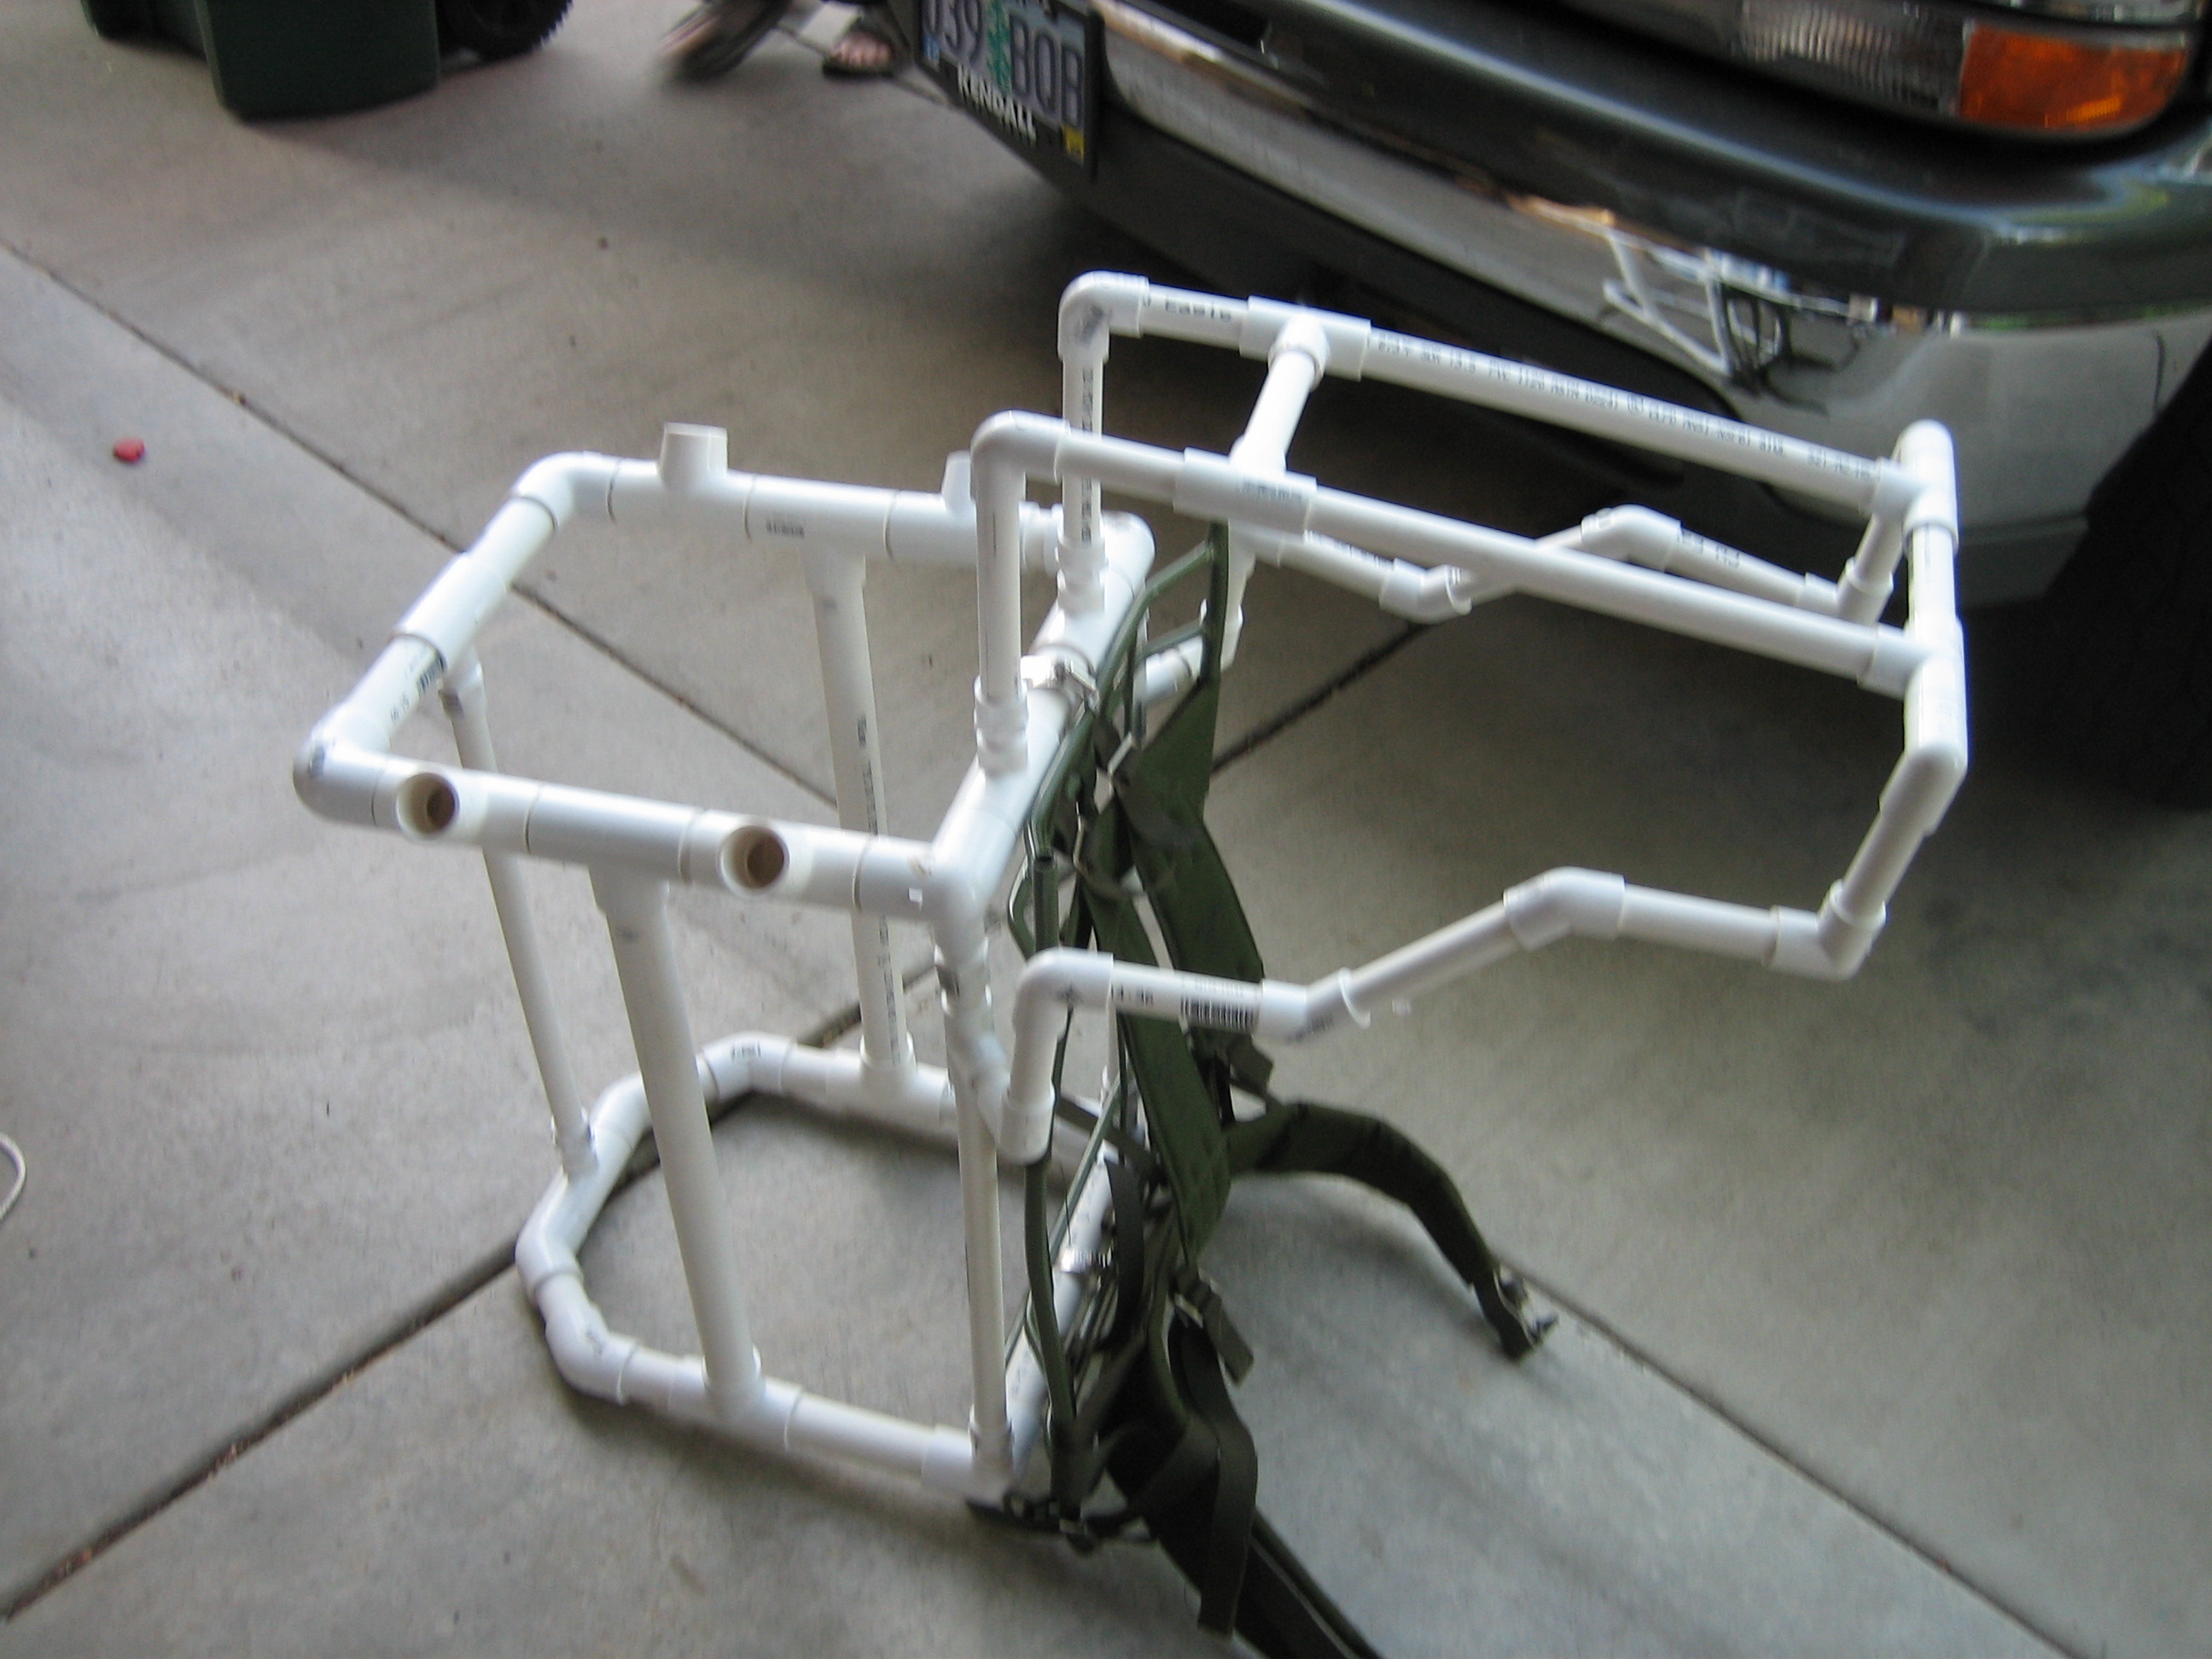
Last time, the big 90º PVC elbows I used to make the costume sit on my shoulders were... terrible. They were hard, they put a lot of weight on a small area, they had big, pointy teeth... effectively, making someone else wear the costume would have qualified as a war crime. A friend of mine (Hi Josh!) who is a Marine told me at the time to retrofit a military backpack, the kind with the metal frame on back. Obviously, that was a STUPID idea, since I didn't do it. Being the swell guy I was, I deigned to humor him and went to a surplus store this year to try one on. As it turns out, it wasn't that dumb of an idea after all. In fact (and I have to pause for a moment to get the crow out of my mouf) it was absolutely brilliant. For $25, I got a metal frame with backpack straps attached. Putting it on, I encouraged another friend who was with me to grab onto the pack and push down. At one point, he was trying to put his entire weight on it, and the load was completely manageable. Not making eye contact with the other people in the store who had warily watched him jump up and down while trying to overload the pack I was wearing, I bought it and took it home. I quickly determined that I could attach anything I wanted to it using metal pipe clamps, so I went shopping for supplies.
With this in hand, it seems clear that the way to make this work will be to build a PVC frame for the middle part, then hang everything else off of it. The weight will be distributed to the pack straps and the belt around my waist, so I should be able to wear it a lot longer.
The arms will also be PVC, probably a lot of 1/2" pipe with some 1" PVC serving as a skeleton. I'll try to avoid using Styrofoam for structure. While it was a lightweight solution for the last costume, it had a tendency to break free of the PVC skeleton it was attached to.
A nice to have but not vital is sound effects. I wanted to do this with the other costume, but ran out of time. If I can figure out a good way to have movement noises, I'll do it. Update as of 10/25/05: Probably not gonna happen.
Timeline
I'll do the central frame first, then the arms, then finally the legs.
After the structure is done and glued, I'll paint it all dark green and start
detailing. Hopefully, it'll be done before Halloween, otherwise I'll look
silly wearing it around town.
Progress
|
|
 From the back, you can see the 'spare pistons' I installed that attach to the arms from behind at an angle. |
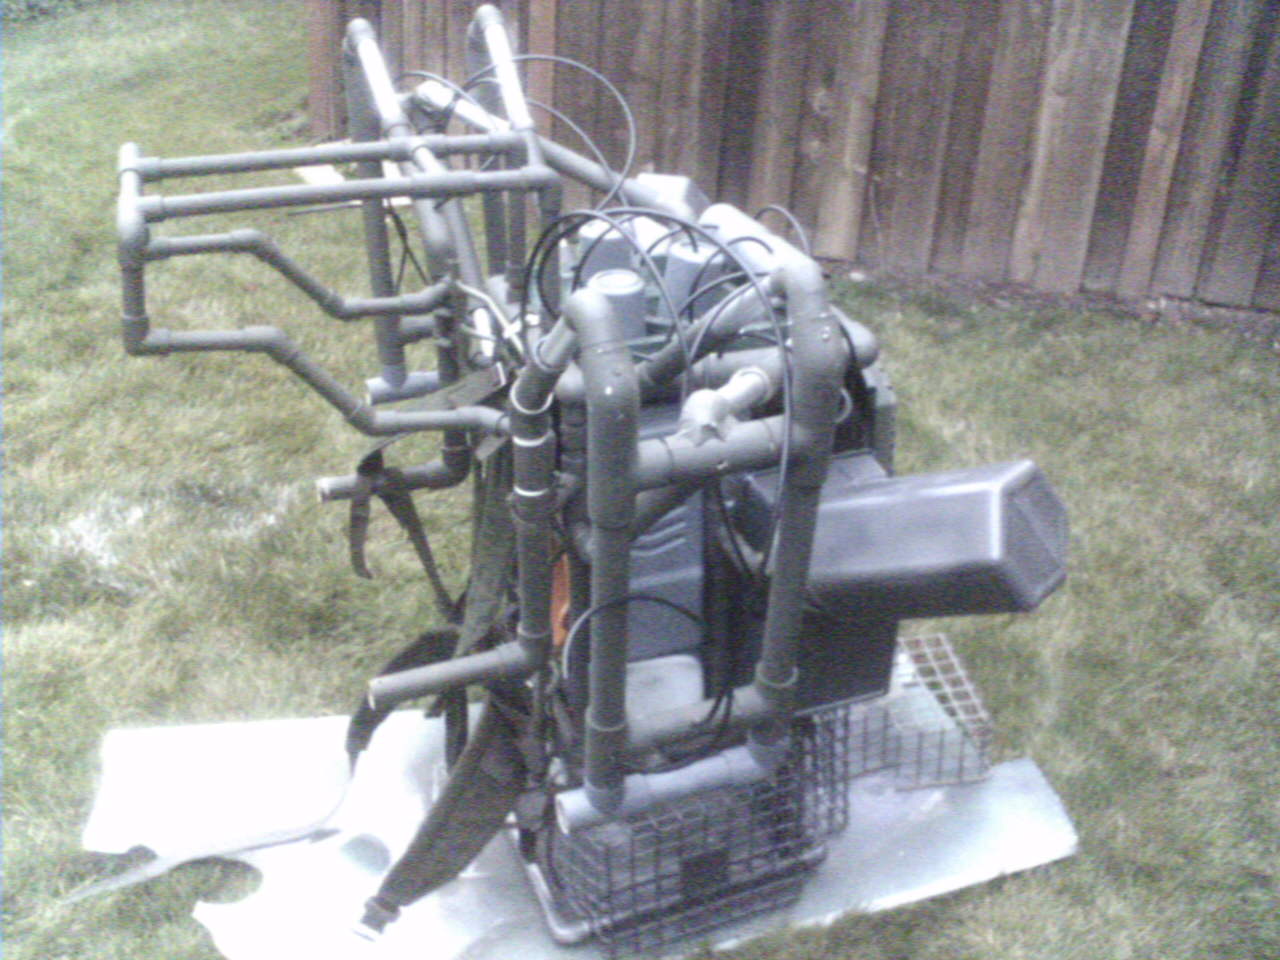
Last night and today was busy. I spent a bunch of time finishing the detailing of the main engine frame. I took a bunch of different plastic things from the Dollar store, painted them, cut them, and glued them in the right places. I painted some plastic baskets grey and attached them to the bottom of the main PVC frame. I braced them with some 1/2" pipe and used zip ties to hook them to the body. As a result, the frame now sits up about a foot higher when on a table, which both makes it easier to get into AND hides the top of my legs (down to the knees) from behind.
Today, I zip tied the shoes for my fake legs to the seat, and used some safety pins for the pants themselves. I also stuffed a bunch of polyester fill into the pants, mostly the crotch region for realism, of course. I painted some hexagonal storage bottles a metallic grey and attached them to the some open 1/2" female connectors in the sides of the main frame. They now stick out at 45° degrees and backwards, and look pretty rockin'.
Remember how a couple months ago I moved the arms forward, leaving a couple of prominent 1" mounting holes at the top? No? Well, read more closely next time. Anyhow, I made some special connectors and put a couple of 'spare' pistons I had built into those facing forward and connecting to the arms. It adds a lot to the look. I wish I had something better than my "honest boss, I'm trying" cell phone camera to show you, but it's still in the shop. No, literally, it's at Canon. I imagine there may be one or more people at the party tomorrow with cameras, so I'll update things afterwards.
In the interest of not getting fired at my job at tomorrows costume party, I sanded down the screws on the bottom of the feet and installed (ok, glued, Mr. fancy pants) some dense foam to protect the wood floors I'll be shuffling across.
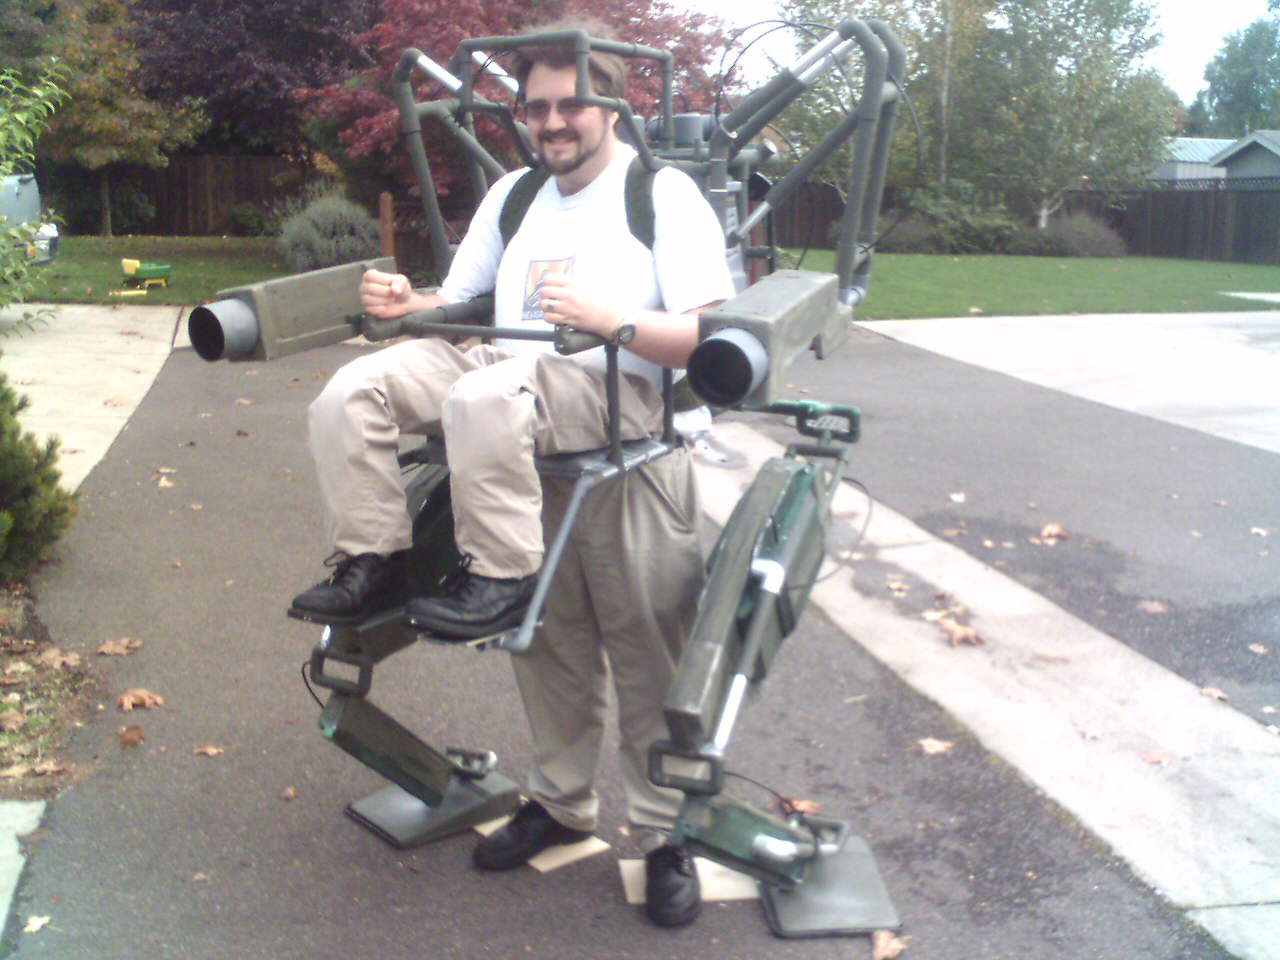
I put the whole costume into the back of our Suburban. Now, the Suburban is a big vehicle, but this costume fits in the back with very little excess clearance. "Did you measure it, Ben?" you ask ingenuously, and I laugh the laugh of a madman. "Measurements are for chumps!" My future in the aerospace industry is assured. The costume, a roll of ducttape, some touchup paint, and the little container of retainer bolts for holding the suit together are all in the Suburban alongside the costume, so I should be equipped to do some last minute patching if needed. Tonight's final little tasks will be to decorate the green pants I bought at the army surplus store so that my legs are a little less obvious than in the picture below. We shall see, I made some small pistons to attach.
|
|
10/29/05 - I did my first full-up test yesterday, and for the most part, it works! I definitely need an assistant to help get it on, there are some attachments points that are pretty stiff. I'll experiment with using some WD-40 maybe to ease assembly. Works with the ladies, right?
I have decided to make some changes. The first one was that my feet attachment points were a bit mismeasured. By 'mismeasured' I mean of course that I didn't measure them at all, and it turns out to have been a problem. Namely, I assumed that the robot legs would stick out a lot further then they actually do. As a result, the attachment point for my shoes were too far inside, so that every time I stepped, I was in immediate danger of tripping over myself and falling in what would no doubt be a spectacular explosion of PVC and ducttape. So I ripped the shoes off the boards and moved them outwards to be flush with the insides of the big fake feet for the robot legs. I'll need to trim the hardboard pads as well so avoid falling. Second, my real legs are really really really really visible. At the suggestion of wifey, I bought a pair of green army pants today that we will try and decorate to make look like part of the device. It may suck, or it may be brilliant. We'll find out shortly. Barring that, it'd still make a wicked static display. Check this out:
|
|
10/27/05 - I think... the costume may be just about done. I spent yesterday working on the legs. I ran some hydraulic tubing for the pistons, glued the end of the PVC 'ankle' to the hardboard I'm using as the shoe attachment point, and made a big foot out of plastic. I was so enamored with the plastic paint tray I had gotten from the Dollar Store that I promptly returned and purchased two more. I cut a channel in the tall part of the tray and fit them over the 1/2" PVC ankle, then screwed and glued 'em to the hardboard. I now have big flat matte green feet. For detailing, I might cut some soft foam flaps, paint them, and put them out along the side to look like support 'toes'. Things remaining: Build a control panel, attach the fake feet to shoes, finish putting 'machinery' in the empty frame for the thorax in back, then.... I think just detailing. Sweet! I will try and do the first full-up assembly test this evening after work. If there are no dramatic failures or problems discovered, I'll be in good shape to have this done in time.
|
|
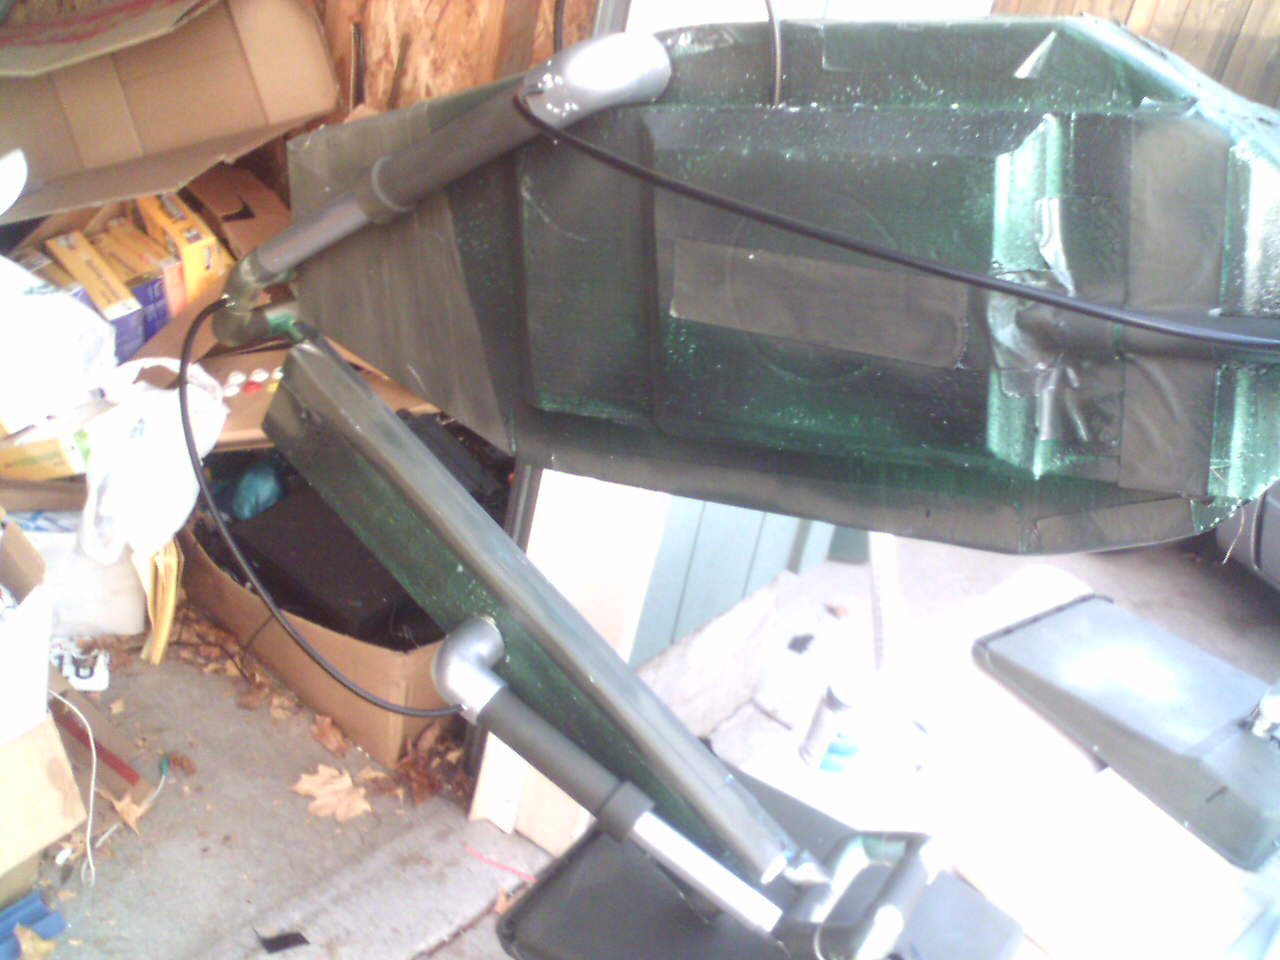
10/25/05 - The pace of reporting here should pick up as we get closer to go-day. Last night, I drilled and ran more hydraulic tubes through the arms, and they're looking pretty good. I'll post pics soon. Additionally, visited a Dollar Store and walked out with $4 of great plastic goodness for detailing. A snack tray, painted matte green, has become the back-piece for the main frame. A piece of chromed cardboard on the inside, barely visible through the holes, suggests machinery just out of sight. Some in-the-style-of-Tupperware storage bowls have been painted chrome and placed in the kidney area of the robot frame (Do robots have kidneys?) to look like valve or engine covers. I've painted an additional one gray to glue to the backplate. I also bought a "cake saver", and the clerk began to suspect that I did not have a cake planned when I didn't realize that the cake saver comes with a lid. I'm thinking I can do something with it to simulate the bulk of an engine or power source and use it to fill up some of the big empty inside of the main frame. Finally, I have a disposable paint tray that may go on the bottom, depends on my whims today after work. BTW, one difference from the pic below with the guns, I've glued a couple soda cans together for each gun, painted them chrome, and put them in the hollow part on the bottom. Finally, I've switched the guns with each other so that detailing is visible from the outside. It looks pretty sharp, especially if, like me, you're blinded by the effort you've put into them. They may look like crap to everyone else, one of my neighbors who accidentally engaged me in conversation yesterday seemed cautiously optimistic about the outcome before backing carefully away. We shall see.
10/23/05 - The last couple weeks have gone by in a blur, so I'll cram in as much as I can. The short version: I'm almost done. The slightly less short version:
|
|
It was the best of times, it was the blurst of tim- scratch that. So, the wife is out of town again. She's lounging about in Florida enjoying the hurricane up close and personal (I'll conveniently ignore the 16+ hour workdays she's been putting in at the restaurant she's helping to open up until today) so I've had the kids. As established earlier in this disjointed narrative, two young kids are not super helpful at this scale of arts and crafts. Every half minute, I'd need to break away to take the following items away from secondborn:
|
|
I've gotten occasional bits of work done:
|
|
9/30/05
- I've done just about nothing since the last update. That's not to
say that I haven't been working on the costume, just that I haven't gotten
anything done. My wife is out of town on business, so I have my three year
old and 19 month old sons to keep me occupied, and every time I try to work out
in the shop... well, things just don't quite come together. As
mentioned before, I have some test femurs ready, and I want to glue them into
the skeleton. To do this, I'll need to glue the skeleton of the leg (I've
only made a left leg so far), then somehow route a path through the foam for the
PVC. Per a friends suggestion, I trimmed 6" off part of the leg, and the
proportion looks better. Oh, and the paint department guy at the local
home improvement store is a damn liar, that new Krylon paint most assuredly DOES
melt styrofoam.
.jpg)
Foam cutting begins
9/26/05 - Holy bejeesus, I haven't worked on this in a long time. Well, I have done a couple of small things on and off, but.. mostly off. Exciting news, I have decided how to connect the legs to the body! I put a T-connector on each size at the bottom jutting outwards about 6". At the end, I have a 1"->1/2" connector that goes backwards an inch, then a 'hip joint' that goes 30" forward to a 'knee joint', then goes 20" backwards to an 'ankle joint'. Each of these joints is the same design as the one I used for the knees of my mech costume. I actually cut the knees off the old costume to use as reference, and then, heck, decided to use them as functional joints as well. After this weekend's work, I now have five or six of these guys. This should make walking quite a bit different than the last costume. Since there will not be plastic-on-plastic friction, it might be easier. Here's hoping.
|
|
Once I had a skeleton for the leg, I started work on foam shaping. I got some 1"x2'x8' sheets of styrofoam and started making what I hope will look like hefty, forged steel legs to go over the PVC skeleton. I was originally planning on boxing my feet inside something, but I was having a hard time getting something to look good. Well, I have a few weeks yet if this doesn't look good. Of course, now I have to figure out how to paint the foam without melting it. Paint them with epoxy? Cover them with paper? Any ideas are welcome.
I cut the first one using a kitchen knife that's followed my shop around for the last year (ever since I ruined it cutting some spray foam that wasn't completely set). The resulting jagged mess and snowstorm of styrene bubbles left me wondering if there was a better way. After a moment, I remembered that just a couple weeks earlier, I had built a hot wire foam cutter out of a 12v DC power adapter, styrene, some nichrome wire, and a pack of gum. Well, the gum was for chewing, but I think it really made the project go better anyhow. So I cut the second one using the contraption, and by golly, it worked. Not only that, but it worked GREAT! I cleaned up some of the edges on the first one with it, then indulged in a little bit of decorative beveling of edges. Will it make them look better? We'll find out, next bat-episode.
8/18/05 - A troubling day, with some gains and losses. I painted the various pistons, and they came out looking great. Each arm has two on the top and one partway down as a brace (which faces a different direction), and this looks good. After they dried, I put both arms onto the frame and stood back. It looked great. I put the rig on (in itself a Homeric feat worthy of poem) and crab walked to my front porch. "Crabwalked?" you ask, with a slightly upturned eyebrow. Well, the costume is shaping up to be... wide. The arms stick out a couple feet, plus it's taller than I am by about a foot, so object clearance is a real concern. Once on the porch, I posed for myself in the reflection of the window. ...and a sinking feeling began to suffuse my very being.Looking at my reflection and visualizing the legs, I realized that.. it just wasn't going to work. My legs, being (as is the custom) attached to my body and the frame for the robot being BEHIND me with the arms back there... there would be no way anyone would mistake my for being carried by a robot, no matter how fine the faux legs arched out in front of me might look.
Conundrum....
So the arms attach in three places, two on top and one to brace near the bottom. I moved the arms toward so that the back arm now attaches to the front arm hole. The front arm was now dangling, but the proportions looked a lot better. I took a hose clamp and fashioned a mount for the front hole, and was able to line up the 'brace' piston below with a connector I installed, so it looks like it will work. It's not as solid as it was before, but should be fine with a little more work. I'm thinking of wrapping the area with fiberglass cloth and epoxying it maybe.
8/17/05 - Last night wasn't terribly productive from an output point of view, but I certainly made progress. My 18 month old Alex didn't want to go to sleep, so I pulled a cardboard box out into the yard so quickly spray paint one of the main pistons to see if it would look convincing. Alex came running out to watch, so I had to try and paint this without subjecting him to the fumes and without being able to actually see what I was doing because of the darkness. I took the big Dell server cardboard box I had started the costume with (before switching to PVC) and laid it out in the lawn, then hand sprayed the 1" and 3/4" PVC separately, the 1" as a dark, flat green, and the 3/4 with 'Aluminum Chrome' (a name that seems a bit contradictory). Before painting the 1", I took electrical tape and wound it around the piston end to add some shape. After it was dry, I put the two together and was terribly impressed. It really DOES look like a piston you'd expect to find on the costume, so I have high hopes. I'll post pics as soon as I get my replacement Bluetooth adapter (for cell phone camera shots) or the wife gets back from Vegas with the camera.
8/16/05 - I started work on the arms. My plan is to make what look like hydraulic pistons that attach to the two holes on each side of the top of the frame (see the picture below). They will stick out at an angle, then come straight down. I'll attach the BFG (Boyishly Fantastic Gun-likeobject) to the bottom so it's hanging from the arms. After the skeleton is in place, I'll decorate it a little with some panels to make the arms look more substantial, though close examination will make it look like hydraulic actuators. I expect I'll also be using quite a bit of tubing for detail work, I'm just not sure yet where to get all the black tubing I need for cheap.
To get started, I did some experiments at making pistons. my most
successful method so far is to put a length of 3/4" pipe inside 1" pipe, using
some electrical tape (wrapped around the smaller pipe) to make it a snug,
centered fit. It seems to work pretty well. I also wrapped some tape
around the outside of the end of the big pipe, so it makes the interface look
even more realistic (because it's thicker), and once painted should be
indistinguishable from the pipe itself. A little polyurethane glue on the
outside of the pipe that goes into the other and it should hold together nicely.
My project time is being fought evenly this week between this and converting a
Power Wheels 6V quad to run on a bigger 12V battery. Also, I have my
younger son Alex with me this week while my wife is in Vegas for a convention
and my older son (the Mech pilot Marcus) is visiting his grandma in Seattle, we
we're having fun.
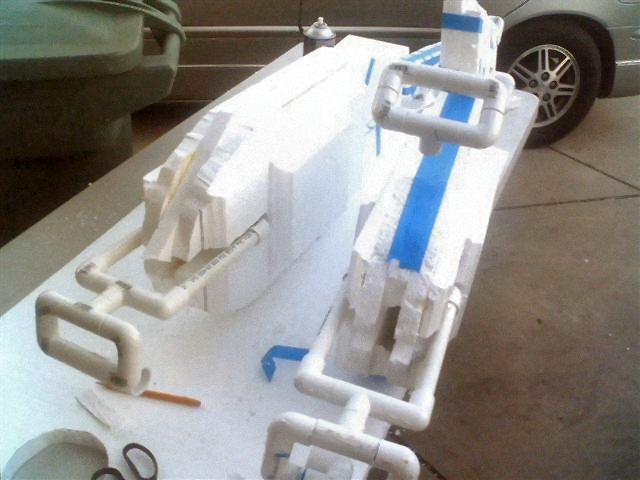
 8/15/05 - I've started cutting and gluing. After a couple nights
work, I have the basic frame for the body just about done. It's a start.
As planned, I used 1" PVC for the main structure, with some 1/2" to cut down on
weight and provide support where possible.
8/15/05 - I've started cutting and gluing. After a couple nights
work, I have the basic frame for the body just about done. It's a start.
As planned, I used 1" PVC for the main structure, with some 1/2" to cut down on
weight and provide support where possible.
The attachment points for the arms are at 45º and glued in place, so I'd better like the way it looks.
In the real APU, there is a (almost completely useless) protective
'framework' made of pipe that the driver is 'shielded' by. Honestly guys,
every hear of windshields? The drivers of these things are in danger of
being killed by BB guns, yet they're knife-fighting super robot mega squids?
Anyhow, I've built this out of 1/2º pipe. I duplicated the main structure
almost exactly, then took my own liberties with how it connects to the frame.
Since the movie version doesn't have an exoskeleton the way the material
strengths demand mine does, there's a lot of wiggle room for how to make things
look good.

I've used a couple of pipe clamps to attach the backpack to the frame, and it seems to work great. For the final version, I'll have more clamps. As it goes, there's a little lip at the bottom of the backpack frame that the frame can sit on, so there's a couple ways that it holds together.
I spent a hazy, barely remembered evening of gluing, and it's all attached. I'm thinking I should work on the ventilation issue a little bit. The thing is solid, and not too lightweight. Luckily, I have this backpack distributing the load, so I could see myself walking around with it as it indefinitely. We'll see what happens once I add the rest of the stuff.
As an experiment, I took a piece of 1" PVC and a piece of 3/4" and made a test piston. The two fit together great, but I'll definitely want to experiment with ways to keep the 3/4" centered in the pipe. Maybe I'll wrap some tape around it?
Background
 As you may or may not know, I enjoy constructing costumes, and each year
try to do something interesting. The first year that I really got into
this was for my first son Marcus's first Halloween. My wife announced that
she would dress him in a little fox costume. After careful consideration,
I sat down and spent a few weeks building a German Tiger tank out of cardboard,
plastic, caster wheels, and so on. By the time I was done, I had a desert
camouflaged tank that could be rolled around with a pusher rod on back.
With that, I made it so that my son, in his little costume picked by my wife,
ended up going as Rommel.
As you may or may not know, I enjoy constructing costumes, and each year
try to do something interesting. The first year that I really got into
this was for my first son Marcus's first Halloween. My wife announced that
she would dress him in a little fox costume. After careful consideration,
I sat down and spent a few weeks building a German Tiger tank out of cardboard,
plastic, caster wheels, and so on. By the time I was done, I had a desert
camouflaged tank that could be rolled around with a pusher rod on back.
With that, I made it so that my son, in his little costume picked by my wife,
ended up going as Rommel.
 Next year, I built a Battle Mech costume that can be
seen here. Months
of work, but I was very satisfied with the result. Walking down the
streets on Halloween was an experience. I was cut off from most external
stuff because of how I made it, but each house went almost the same. I
would park myself on the sidewalk and my visiting mother would take my son up to
the house to get candy. Each time would go something like this. "Oh!
How cute! Here, have a... what the... Hey Joe, come over here
and check this out!" All the adults in the house would come out and look
at my costume. It was pretty cool, especially for an attention whore like
myself.
Next year, I built a Battle Mech costume that can be
seen here. Months
of work, but I was very satisfied with the result. Walking down the
streets on Halloween was an experience. I was cut off from most external
stuff because of how I made it, but each house went almost the same. I
would park myself on the sidewalk and my visiting mother would take my son up to
the house to get candy. Each time would go something like this. "Oh!
How cute! Here, have a... what the... Hey Joe, come over here
and check this out!" All the adults in the house would come out and look
at my costume. It was pretty cool, especially for an attention whore like
myself.
If you think this is super cool and/or have too much money:
Contact: ben@vipmail.com
http://hallert.net/
Notice: The Matrix and APU copyrights belong to Warner Brothers. I don't know nothin' about birthin no babies, and I sure ain't trying to violate them there's intellectual whatnot.

.jpg)
.jpg)
.jpg)