Introduction
Beginning to see a pattern
|
Click to view
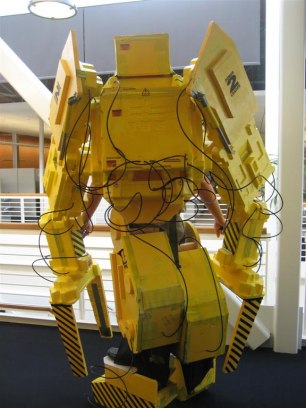
gallery photos of the completed costume |

I've enjoyed building elaborate mechanical costumes for Halloween for the past few years. Two of my recent projects have been particularly satisfying, the APU Costume from The Matrix and my Battle Mech walking tank. Each took a few months to build, and both were well received.
This year, I built a Caterpillar Power Loader J-5000, the hydraulic utility vehicle seen in the 1986 James Cameron film Aliens. My goals were simple:
- Build a costume that is immediately recognizable to folks who know the movie.
- Make it good enough looking so that folks who have NOT seen it will still be entertained.
- Make it light enough that I can wear it without discomfort.
- Make it elaborate enough that it'll knock peoples socks off.
- And finally, I want someone, somewhere to ask something along the lines of "How is it powered?" or "who's carrying you?" My previous two mechanical costumes have both gotten that question, it's the ultimate compliment.
Oh yeah, one other thing. I wanted to finish it in time for Halloween. I know, I know, "perfectionists" and their whole "I want to actually wear my costume in public" idiosyncrasies.
Update 10/31/06: Mission accomplished!
Materials & Construction plans
As with the previous two costumes, PVC had a role. As with my most recent costume, I'll was trying to reduce the amount of pipe in an effort to reduce weight. As such, one of my big plans for this project was to avoid PVC as a skeleton wherever possible. The strength it gives is very useful, but the weight penalty is substantial. As of the beginning of the project, I had the following material/design plans:
- Extensive use of Styrofoam packing blocks to give a premade industrial look and big weight savings.
- Will use another backpack frame from the army surplus store, it was an amazing improvement in the APU costume as compared to the Battle Mech.
- I plan to experiment with putting a latex house paint base on the Styrofoam so I can safely spray paint it (I was unsatisfied with the Krylon H20 paints I used last year on the APU.
- Will build many of the faux hydraulic cylinders that worked so well in the APU.
As the project continues, it will be interesting to see how closely reality matches these early plans.
Update 10/31/06: It was pretty close.
Gallery
![[Link to image gallery]](images/gallerythumb.jpg)
For fantabulous pictures, click here to enter the image gallery.
Pictures are being added almost daily.
New: Video footage of the suit in action.
Current Status
Part II
Wearing it at work
I came into work around 6:30 and brought the legs and feet inside to my desk in seperate trips. On the last trip, I asked the security guy if he could help me with the door on my final trip in. Seeing as the only practical way to transport the upper half (torso, arms, hands) was to wear them, I did so. I ducked and twisted and whatnot to fit through the doors and brought it to an empty desk next to mine.
I checked email first to make sure my customers were well, then began putting on the costume for the first time. I started with the upper body again, then stepped up onto the stilts. I then secured the legs and did some test movements. Whoops! The hanging lights were too low, and I was hitting them and making them swing all over. I adjusted some straps, then began walking. I had to duck and hunch to get past the lights, then it was smooth sailing. This costume is a LOT easier to wear than last year's Matrix APU costume. Also, it's a lot more recognizable, as I found out. I didn't have to explain it because as it turns out, people have actually SEEN Aliens.
After a few minutes, I brought it back and did some work. I worked for an hour then went out on another run . I had to get downstairs to have my picture taken for the contest, but getting onto the cargo elevator was a challenge. I had to bend and twist and curl myself up almost into a fetal position to make it through the door, but I consoled myself by noting that these are the exact same problems a Powerloader operator would have to deal with in real life.
The costume was drawing quite a bit of attention by this point, to the extent that people were yelling for other people to come and see it. The picture went well, and I scurried back upstairs to get to a standup meeting. I was a little late as people kept stopping me in the hallway to take my picture, and I found that it's just about impossible to sneak into a meeting late when you're a hulking, 8+ foot tall walking robotic forklift.
I did another walk during my lunch hour. This one was extensive, and I covered a lot of ground at my work. At one point, I had a bit of a scare. For the last month, I've had this image in my head of walking along the upper hallway of our large, atrium-like inside walkway, losing my footing, and falling to an inglorious death, crushed beneath styrofoam and with my little amber warning light marking the scene of the accident.
This almost happened.
I was telling someone about this image when suddenly the foot that had broken free the night before did so again. I stumbled but was able to set my foot down on the ground without going over the railing. Jason, another guy in my group, went to my cube and retrieved my emergency duct-tape and I secured the shoe more conventionally.
We're having a halloween costume contest, and I'll have pictures shortly of me in the office and the results. I hope I'll place, we'll see!
The past few days have been intense! Very touch and go as to whether I would finish in time, and the answer seems to be that I didn't so much finish it as I reached a point where I stopped working on it. I could spend weeks detailing it, but it's probably good that I had a deadline.
I bought nylon straps that I ran through the top of the leg sections and attached snaps so I could cinch them tight and click 'em together to hold them in place. Wifey bought some black cloth that I hung from the bottom of the legs to cover the 'bridge' between them and the feet.
I glued the shoes onto the platforms, more on that later, there was some excitement.
I made up a bunch of decals and warnings to apply all over (pictured in the gallery) and installed them. I finished the PVC protective 'frame' and painted it a bright, shiny yellow, then attached it to the rest of the costume.
Tons of little stuff I can't even remember, but by last night, I was about ready to call it done. Oh, also made some hydraulic actuators for the arms and legs, those turned out well.
Last night I had my wife put on the costume so I could figure out what was missing/needed to be changed. It was the first time it had all come together, and I was a bit worried, but it looked fantastic. She looked great up there, towering over the cars in the driveway. I went to get the kids to show them her and she began to walk towards the house, and that's when excitement began.
As the kids and I came out of the house, I saw her lose her footing and fall. Luckily, the shoe ripped free of the base and she was able to land well, otherwise she might have been injured. This also saved the rest of the costume, which was good, but left me with a shoe that wasn't attached.
I glued it and let it dry overnight, meanwhile loading the costume into the mini-van. I took out the seats to make room, but it was a close fit. I barely cleared the ceiling when I slid it in.
Panixors! Days have passed with no meaningful progress, and Halloween is almost here! It's been extraordinarily busy at work and home,
I decided (against last years experience with the Matrix APU costume) to use Krylon's H20 latex spray paint. The lack of time, problems getting a paint sprayer, and more left me with little option. I got some and did a quick test spray on some foam outside last night. When I went out to check them this morning, they were essentially unchanged. That is to say, the paint had failed to dry, then had dripped almost completely off during the night because of condensation. Yeargh!
Out of time, I decided to soldier onwards. I've sprayed most of the costume with a latex primer base and the H20 yellow, but it's just not opaque enough. I converted my living room into a combination paint / drying room. I really hope the dry room temperature environment will make a difference. I've posted updates in the gallery near the end, to show the painting progress.
I fabricated the PVC 'protective frame' that extends around my upper body. If it wasn't for that bad boy, I'd be very vulnerable to Alien Queen bites. I used a really lightweight 1/2" PVC pipe to make it to cut weight. As long as I don't try to run 600PSI through it, I should be fine. To get into the frame, I'll have to come in from the bottom, so coordinating a don/duff station will be important. You can see a picture of it here. I sanded down some of the sharp edges on the legs. I think it looks better, we'll see after paint.T-minus 8 days.
Lots o' progress in the last couple days. I've begun detailing the legs a little., in the gallery here. I've also made and attached the pincers to the forearms, visible here.
I've also done test attachments of the upper arms to the main body using the bungie joins, and they seem to work fine.
Next steps:
- The PVC protective frame.
- Covering holes in the costume.
- Detailing.
- Painting.
With 9 days left, time is growing tight.
Last couple of nights have been busy. I'll break it down by section:
- Thorax: Attached surplus backpack frame.
- Legs: Added internal braces where they will rest against my but-tocks.
- Arms: Began construction of! Glued quite a bit of foam together, worked out how they'll attach. I'll have hidden bungy cords holding them to the main body as well as serving as the joints.
As I'm working on this, I'm listening to Neal Stephenson's "The Diamond Age: AYoung Lady's Illustrated Primer". Excellent book, haven't read it in years and the audio version leaves my hands and eyes free for construction. This Elmer's polyethylene glue (very similar to Gorilla Glue) is working well. I was concerned that it would melt the foam because of the acetone agents listed, but I haven't had a single problem yet.
I'm trying to find a revolving amber utility light to go on the head but having difficulty. Spending $25+ for something I'll use just once is hard to swallow, but I might have to if I can't find something cheaper.
Last night I glued a brace onto the upper back of the... thorax? The fuselage? Hells bells, what exactly IS the terminology for this sort of thing? Ok, the 'back piece.' I put this brace in so that it would push it backwards at the top about 6" so that when attached to the army backpack frame, it'll still be up and down instead of tilted forward.
I also took the legs I built last month (before I settled on how I was going to make this whole thing work) and began modifying them. I cut out some foam in the front, trimmed it down, then reinstalled them inside as braces. My legs should now be held in open chambers in the front of the legs (like in the movie) instead of being hidden (and relying on fake legs like usual).
Photos coming soon.
At one point, I was considering just refurbishing one of my other costumes and wearing that again. That's still an option, two hours or so with the Battle Mech might be all that's needed to retrofit a backpack fitting and replace some joints I stole for my Matrix costume, but... I want to build!
Another option was something I've been thinking about for a few years, doing a 'Horta' costume (you may (but probably don't) remember the Horta from the old Star Trek episode 'The Devil in the Dark' as the pizza textured critter that ate through rock with acid spit and crapped silver eggs all over the place). Some rubber foam sewed into an igloo shape, wave a blow torch over it to texture it appropriately, then touch it up with paint and I'd be 90% there. A skateboard to scoot around on under the lightweight costume would complete the illusion of.... a dorky fat Star Trek fan who needed to perpetually explain who he was in a muffled voice from under the outfit.
Those two remain options, but I'm pressing ahead with the Powerloader. It is... m y destiny.
Wifey is back, so I spent the weekend cutting, sawing, gluing, and cutting some more. I have a cunning plan.
Stilts
I'll be building platforms into the legs that I stand on so that I'm a foot or so taller. Without the usual chicken legs or fake legs as an option, this is the visual spectacle I need to make this cool.
While eating chicken purchased at the house of the venerable and inscrutable Colonel, I was inspired to do the above. I promptly went to the dreaded Wal-Mart and bought a couple of plastic CD holders that looked like miniature milk crates. I taped them to my feet and was so enraptured with the effect that I bought more and stacked them. Then I walked around the house a foot taller than before and my godlike perspective inspired me to start working on the costume again. My wife tolerated my booming "Hello down there, little person" jokes for a few minutes before suggesting that an accident involving me being pushed might be unfortunate. I glued the pieces together, reinforced them with duct Tape, then retired to the Garage to continue working.
I've build foam feet around them styled after the Powerloader in the movie. I cut some hardboard pieces to glue to the bottom to add structural strength, then I set the feet aside to start work on the upper body piece.
I cut the backpiece out of more 1" pink insulating foam then glued and taped styrofoam pieces from various computer boxes to the back to create side with little weight. It's amazing, the equivalent backpiece to my Matrix costume weighs maybe 5-10 times as much as this all styrofoam piece. I anticipate adding another few pounds, but this will be much lighter than my past two robotic costumes.
I will continue work and updating my progress at a quicker pace. The holiday demands it!
The epoxy was getting pretty dang expensive, so I've been experimenting with some things that I apply w/ a caulking gun and also used a bit of aircraft epoxy from my other project, both seem to work well.
I then epoxied a piece of foamboard atop the above structure, enclosing the leg. More to come.
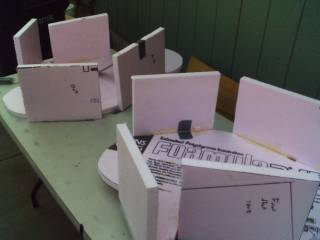
I've played with the styrofoam panels, I think they'll serve
best for detailing. I've bought a couple panels of 1" thick pink
styrofoam
insulation from the hardware store. I'll begin building the legs
immediately from them. Here's a rough idea of how I'll construct them
(keep in mind that my legs must fit into them).
I'll have a hardboard plank on the bottom that I step on, and I'll have to be able to somehow get my shoes into it. Foam walls, epoxied and wrapped with ducttape. I may use fiberglass over the legs for strength, I'll play it by ear.
I've brought some styrofoam panels home from work. At one time, they held some LCD monitors in a close embrace and protected them from the bumps and lurches of transport. Hopefully, they'll soon protect me from the laughter that a poorly constructed costume will no doubt bring. I'll try and paint them tomorrow.
So it turns out that making the costume is a little harder than wiggling my nose and wishing. Consequently, I have begun collecting styrofoam panels at the office for use in construction. Yesterday I visited the local hardware shop, and they felt reasonably optimistic that my plan of coating the styrofoam with latex paint first would allow it to be safely spray painted, especially if I purchased the paint from them.
A trip to the surplus store to get a backpack frame is in my future as well, I sense.
Ok, got the website set up. Now that the tough stuff is done, time to whip out the costume.
Chat
Contact
Ben Hallert - ben@vipmail.com
Template
design by Six
Shooter Media.
© 2006 Ben Hallert
Part III Trick or treating
I discovered that I can shuffle down the street at just about the same speed as two sugar-blasted kids can trick-or-treat. As long as I kept going and wifey managed their actual trips to the door, I stayed just about parallel with them in the street. Any time we hit a candy desert (a stretch of houses with the lights turned off) they'd shoot ahead, but eventually I'd catch up.
On my way back, the kids and wife shot ahead to get some tired kids home. A half a block away from the house, my _other_ foot broke free and I came within a metaphor of falling over completely but managed to recover. I picked up my feet (literally) and trudged the last little bit home. I posed the costume in the driveway menacingly and later put it away.
Halloween == done!
Oh, one other little thing. The results came in from the costume contest at work. 1st prize! There were some really great costumes this year, so I know it had to be a tight win, but it's super great.